Storage
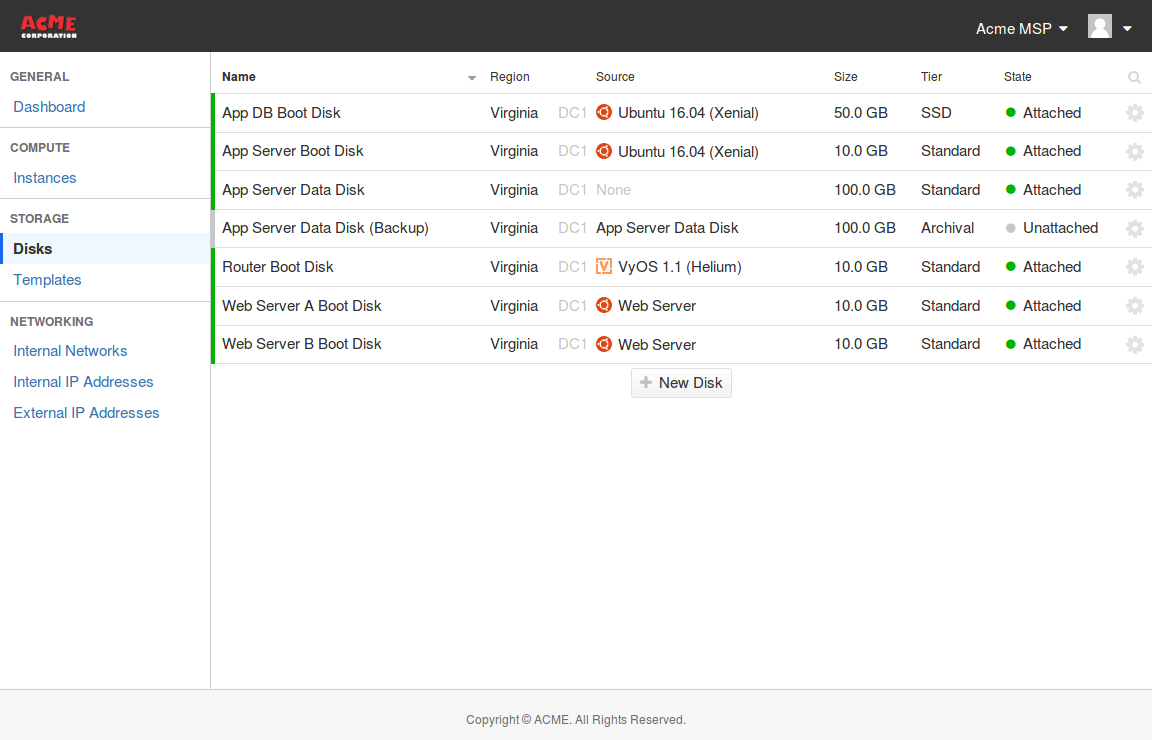
Block storage on the OrionVM Platform consists of disks. These are attached to Instances for booting operating systems, or for data storage.

Viewing Disks
Disks can be administered from the Panel sidebar under Storage. The columns in this screen are detailed below:
| Column | Description |
|---|---|
| Name | friendly identifier that can be changed at any time |
| Region | data centre where the disk resides (such as Sydney (SY3)) |
| Source | operating system created from, if applicable |
| Size | disk capacity in GB |
| Tier | performance tier the disk operates on |
| State | either attached or detached from an Instance |
| Actions Menu | actions that can be performed on the disk |
Performance Tiers
All disks created on the Platform operate on one of two tiers, with a third in the pipeline.
| Tier | Description |
|---|---|
| SSD | high performance SSD tier. Useful for when disk speed really matters. |
| Standard | a good balance of performance and price. Outperforms many other cloud providers, owing to the platform’s Infiniband fabric. |
| Archival | spinning disks capped at 2000 IOPS; an affordable option for backups and long-term storage. |
Boot Disks
Boot Disks are one of the two disk types that can be created on the Platform. As the name suggests, they can be used to start an Instance, and are configured with a pre-built operating system when created.
For a list of supported operating systems, refer to the Templates section.
To create a Boot Disk:
- Go to the Disks screen under Storage in the sidebar
- Click New Disk from the bottom
- Choose a Name for the disk, which Region you require, the Performance Tier, the Template operating system required, and choose a Size in GB.
- Click Create
The disk will be provisioned within seconds.
A quick alternative is to have a Boot Disk created when you create a new Instance. Refer to Instances for details.
Blank Disks
Blank Disks can be created in much the same way as Boot Disks. Unlike Boot Disks, they contain no operating system or partition table, leaving it up to you how you wish to use them.
To create a new Blank Disk:
- Go to the Disks screen under Storage in the sidebar
- Click New Disk from the top-right corner
- Choose a Name for the disk, which Region you require, the Performance Tier, and choose a Size in GB.
- Select Blank disk as the Template.
- Click Create.
This disk can now be attached to an Instance as a secondary disk for data storage.
CD-ROM Disks
These disks are set as CD-ROM by the Panel, and are detected as bootable CD-ROM disks by Instances. They require you to have imaged across a compatible ISO image to a Blank Disk in an Instance, typically with dd.
Upon configuring a Blank Disk with an ISO, you can set it as a CD-ROM disk.
- Go to the Disks screen under Storage in the sidebar
- Click the ⚙ Actions button corresponding to your target disk, and choose Configure/resize
- Select CD-ROM.
- Click Save
Cloning
Disks can be cloned a short time after provisioning, even when attached to a running Instance. The OrionVM Platform will automatically clone the underlying replicas to ensure a minimum n+1 redundancy.
WARNING: Performing a clone of a live disk processing in-flight transactions and writes can cause data inconsistencies. We recommend shutting down an Instance to perform a disk clone when practical.
To clone a disk:
- Go to the Disks screen under Storage in the sidebar
- Click the ⚙ Actions button corresponding to your target disk, and choose Clone
- Edit the name, select the performance tier, and confirm the pricing for this disk, and click OK
- Upon completion of the clone, click the ⚙ Actions menu button and click Configure/resize
Resizing Disks
Disks can be resized shortly after provisioning. This can be used to expand a disk that has outgrown its initial size, without requiring the creation of a new disk of a larger size and copying data across.
WARNING: Be careful when shrinking disks. If you shrink a disk without adjusting the partition table first you WILL corrupt your file system. Use one of the tools listed below to adjust your partition table as required.
To resize a disk:
- Go to the Disks screen under Storage in the sidebar
- Click the ⚙ Actions button corresponding to your target disk, and choose Configure/resize
- Drag the slider to choose a new target size, or click the capacity and type a custom number.
- Confirm the pricing and new size for this disk, and click OK
The disk is now a larger size, though the partitions will need to be expanded to fill this space. The following tools can be used to adjust as required:
| File System | Utility |
|---|---|
| Linux ext2, ext3, ext4 | resize2fs |
| Linux xfs | xfs_growfs |
| Windows Server NTFS | Diskpart |
| FreeBSD zfs | zpool (zpool set autoexpand=on tank) |
Disks are soft-limited to 2 TB by default. For larger sized disks, contact your account manager or OrionVM support.